


How to Create a Product Photography Set Up at Home: a Complete Guide for Makers & Artisans
As a maker or artisan, you know that in order to stand out online and be seen in the endless scroll, you need to have high-quality product photos. But if the word “photography studio” makes you think of expensive lights, complicated backdrop systems, and something only professional photographers utilize, think again! In this blog post, I’ll guide you through the steps required to create a budget-friendly product photography setup at home, that allows you to capture quality images of your handmade goods!


Step #1: Finding the Right Light
For natural light:
One of the most important factors in getting quality product photos is having enough quality light. If you’re taking photos with natural light, create your home product studio right next to a window.
The north side of the house will produce filtered light, or choose a window that’s the opposite side of the sun (so in the morning, that’s a west window, or in the afternoon, that’s an east window).

You don’t want direct sun, which produces harsh shadows, but if this is your only option, you can use a diffuser to soften that harsh sun, as I did here for this product photoshoot of some handmade soap from Maine maker Headland Homestead.
For artificial light:
If you don’t have a great spot in front of a window- or you don’t want to be beholden to the weather whims or sun patterns- then you’ll need to have artificial light!
This allows you to choose whatever spot is convenient for you since you’re not reliant on the sun!
<script>
  (function(w, d, t, h, s, n) {
    w.FlodeskObject = n;
    var fn = function() {
      (w[n].q = w[n].q || []).push(arguments);
    };
    w[n] = w[n] || fn;
    var f = d.getElementsByTagName(t)[0];
    var v = '?v=' + Math.floor(new Date().getTime() / (120 * 1000)) * 60;
    var sm = d.createElement(t);
    sm.async = true;
    sm.type = 'module';
    sm.src = h + s + '.mjs' + v;
    f.parentNode.insertBefore(sm, f);
    var sn = d.createElement(t);
    sn.async = true;
    sn.noModule = true;
    sn.src = h + s + '.js' + v;
    f.parentNode.insertBefore(sn, f);
  })(window, document, 'script', 'https://assets.flodesk.com', '/universal', 'fd');
</script>

<div id="fd-form-6203f470d328ec5152cef6ff"></div>
<script>
  window.fd('form', {
    formId: '6203f470d328ec5152cef6ff',
    containerEl: '#fd-form-6203f470d328ec5152cef6ff'
  });
</script>
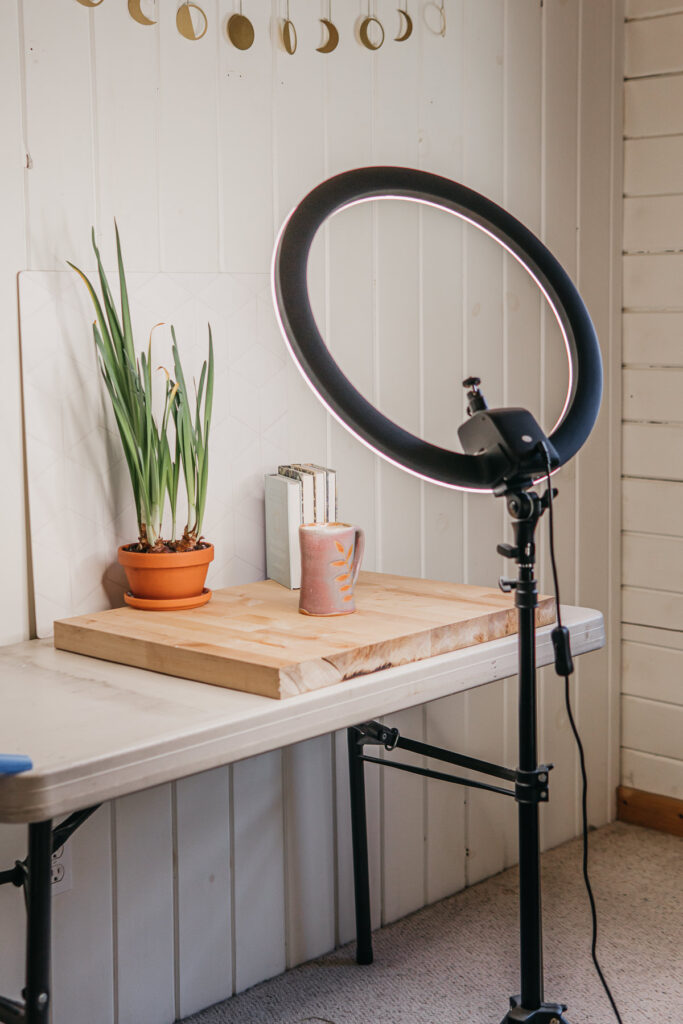
Step #2: Select the Right Location
Most handmade goods don’t require a lot of space to photography, but make sure you have adequate room to move around a bit so you can capture multiple angles of your goods. If you’re using artificial lighting, make sure you have enough space so you’re not knocking into them (or tripping over the cords!)
If you’re shooting on a manual camera, or a zoom lens on a phone you’ll also want to determine how far away you’ll need to stand in order to “zoom out” enough to get your product in the frame. Do you have enough space without backing into a wall?
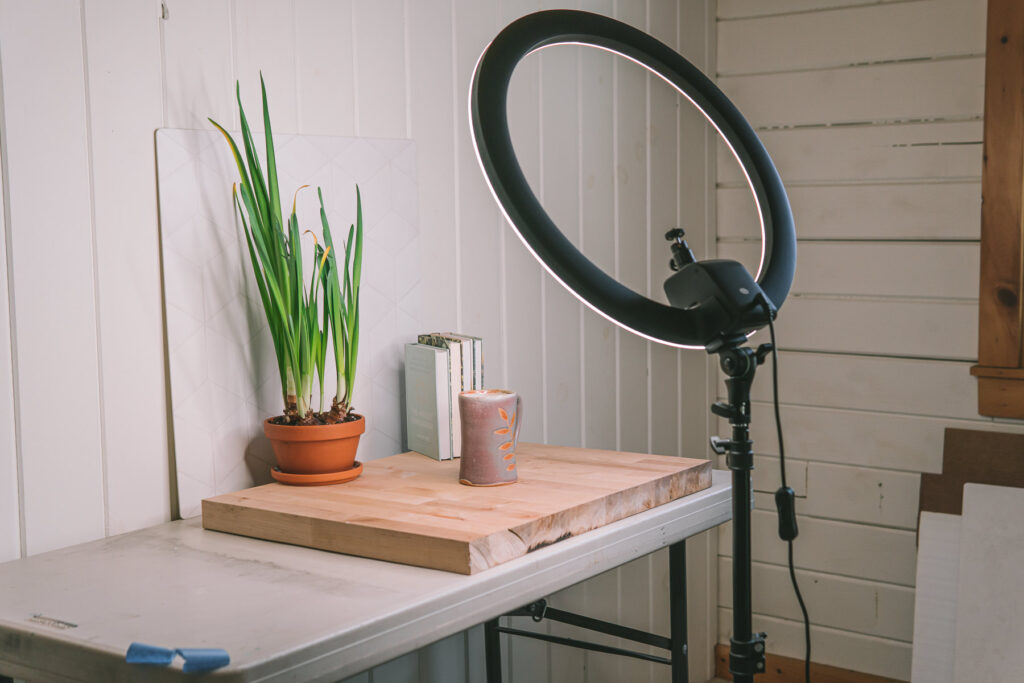
If possible, create your home studio in a spare room or corner of your home where you can leave it set up. This will save you time when you have a new product launch you need to capture, and ensure you have consistent images across your online shop (a sure sign of a professional!)
You can photograph your items on the floor, but having a higher surface can be more comfortable on your body (and, easier to get straight-on shots). Use a folding table, a crate, a storage tub, or some other raised surface!
Step #3: Set Up Your Product Photo Background and Surface
For product listing photos, you’ll want to choose a neutral backdrop for your photos so your product stands out. Some online shops require a white background, but if you’re listing your products on Etsy or your own online store, you can use a plain white, cream, black, or choose a colored backdrop that complements your product.
Once you have your location set up, it’s time to put up your photo background and surface, and there are 2 main ways to do that, depending on your style:
Creating a seamless background
A seamless background is where the background is both the backdrop and the surface, and it curves so there is no seam where the surface and backdrop meet.

You can create this type of background by using:
- a roll of seamless paper,
- a piece of poster board
- a sheet, tablecloth, or curtain (make sure all wrinkles are ironed out!)
- Purchased vinyl backgrounds
- Contact paper
You can attach the background to a wall using tape or tacks, create a solid background support with foam core board or cardboard and some shelf brackets, or use a purchased T-stand.
Using a background + surface
If a seamless background creates a too sterile or e-commerce vibe, then using separate backgrounds and surfaces may be a better choice. This is particularly a great setup if you’re creating lightly styled images and want to place your product in it’s “natural habitat” like a bathroom or a kitchen, or choose colors or textures that support your brand mood.
There are many different options you can choose: you can purchase background and surfaces, or you can look for items around the house!
In this soap example, the maker has her own online shop. She has a very warm and down-to-earth mood, so I chose a purchased cream-colored textured plaster background and a ceramic floor tile in a marble surface, bringing in an idea of a bathroom counter.


Step #4: Gather your Product Photography Props
Using props in your photos can be a great way to attract your ideal customer, tell a larger story, and connect it to your brand.
If you’re using props to style your products, don’t wait until photoshoot day to gather them! You also want to choose them with intention- grabbing random things around the house just so you have something to stick in the frame probably isn’t the best solution.
Choose props that are logical and relate to your product- such as a washcloth or a hairbrush for something bathroom-related, matches for a candle, or a spoon and tea strainer for an herbal tea blend.

Check out these at-home product photography setups:
Creating your home photography studio set-up doesn’t have to be expensive or complicated! With a few simple tools and techniques, and a little bit of creativity, you can take high-quality product photos that will help your business stand out online.
Need some more ideas?
See how three makers create a product photography setup at home to capture their handmade goods!
Amphitrite Studios
Amphitrite Studios creates timeless linens for the home. She photographs her items on a sheet of contact paper that she drapes over her cutting and sewing bench.
This gives a seamless background and surface. She uses a ring light in the front to ensure her products are evenly lit and there are no distracting shadows.


Yellow Bird Textile Co
Yellow Bird Textile Company makes handwoven pillow covers.
Because her products are a bit larger, using a purchased background or surface doesn’t work for her. Instead, she came up with a very creative solution- she uses basic hollow-core doors that she’s painted a flat white!
She sets two of them up on her floor to capture her beautiful pillows. Using a solid white helps her textile colors really pop and gives her website a very clean and modern feel!


Queen Fayzel
Queen Fayzel is a stationary studio that makes heartfelt and sassy greeting cards. She captures her products in a few different ways, but the easiest is to simply hold a card up!
Her home photography studio consists of a blank wall in her home and a tripod for her phone. Having this human element of a hand is a great way to show scale, so people have an idea of how big the card is without having to look at any of the product details!


